Stopping your 401(k) contribution with Company Match to get Debt Free

When I first heard about Dave Ramsey’s baby steps there were a few things that I struggled to grasp like his notion that you want to use any excess cash you have to pay off debt so that all you have in your emergency account is $1,000. The second thing was to hold off on ALL retirement investing until you are debt free. However, if you can’t pay off all your debts in 2 years then you should contribute enough to get at least the company match. I’ve read multiple conflicting views on this where some people say the idea is ludicrous and you should still invest up to the company match while trying to pay off debt because it’s a guaranteed return and free money. It’s a generic answer but I believe it is this: it depends – personal finance is PERSONAL therefore it all depends on your situation and how comfortable you are with your current financial condition.

I did a lot of research on Google and there were good arguments from both sides however I decided to run the numbers for my situation and my conclusion also depended on my current financial standing as I mentioned above. Below is a spreadsheet I used to calculate the amount I would be investing in my 401(k), the company match, and how that plays into my goal of getting debt free.

401k company match
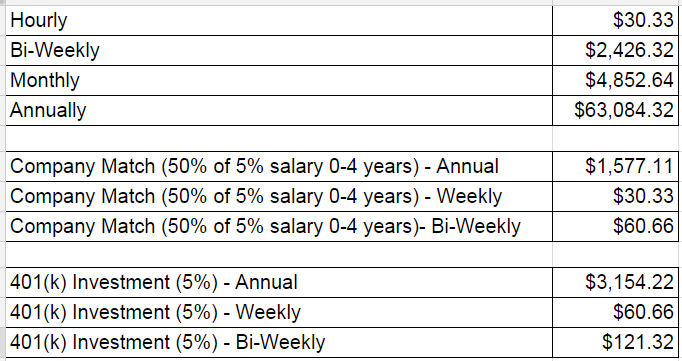
401(k) contributions are pre-tax therefore it makes the calculations for your contribution amount and company match a lot easier. As you can see from above, my annual salary is $63k and if I invested 5% of that (just enough to get the company match) I would be putting $3,154 into my 401(k) while the company would match with $1,577. The company match also varies because some companies might give you the full 5% of salary while others might be less – my company matches 50% of the 5% from years 0-4 and increases as you gain more seniority in the company.

I am losing $1,577 of free money every year by not investing 5% in my 401(k) – I suggest everyone do this calculation so that you have a concrete number that you can visualize. To be honest, I thought it was a lot more than this so I was little shocked when I saw it was only $1,500 bucks. The other big part of this equation is that I’ll also be giving up $3,154 of income (this $$ be lower due to taxes) that I could use to pay off my debt. Ultimately, my decision to stop ALL retirement investing came to 3 factors:

1. The company match was “minimal”
If it was $5,000 then this would be a different story but it was only $1,500! The amount was not substantial enough to dilute my goal of getting debt free!

2. I plan on getting debt-free within 2 years
My goal was to be debt-free by January 2017 and my current schedule shows me being a few months ahead of that. I’m also an avid saver therefore I had no fears of increasing my retirements savings once I’m debt-free.

3. I’m young and already have a decent amount in my retirement accounts.
This is probably the biggest reason because I’m 26 and I have $72k in my IRA and 401k. From my research, I know that amount is years ahead of my peers therefore I was comfortable of where I stood in regards to retirement savings.

I had a lot of trouble deciding on stopping my 401k contribution but at the end of the day I lived by this quote for my debt-free journey:

“If you really want to do something, you’ll find a way. If you don’t, you’ll find an excuse.” – Jim Rohn

I didn’t want to dilute my focus by one atom therefore I stopped my 401k contribution and never looked back. The best way to decide is to do the calculation I did above for your situation and take into the factors that I considered like your age, what’s currently in your retirement savings, and what is the company match policy for your 401k.

Good luck!

My Battle with a Twitter Troll

I grew up in the internet age therefore I know all about trolls and trash talking on the internet. An internet troll is someone who lurks around the internet behind their veil of “anonymity” and makes senseless arguments and comments about hot-button issues just to entice a response from others – basically your virtual bully except much, much, much more dumb. Well, I happened to attract one after I wrote my blog post about what it was like driving for Uber in PDX. I’ve dealt with internet trolls through my gaming experiences but never on websites/Twitter/Facebook therefore I didn’t REALLY know that people went out of their way to make comments about others. From what I can gather, the troll was a cabbie who didn’t like Uber encroaching on their “time-tested” industry of taxi cab drivers. I don’t even know why I engaged in the pointless banter but it just goes to show you that the internet is full of idiots with opinions and you know what they say about opinions, “An opinion is like an asshole, everybody has one and it usually stinks.” The same guy also goes on to make comments on my blog but I didn’t publish them because I love freedom of speech as much as the next person but I see no point in publishing his pointless comments. Also, he’s a Ducks fan so that kinda explains a lot 🙂

It all started with me posting my blog on Twitter to garner traffic.
1 - Tweet about blog
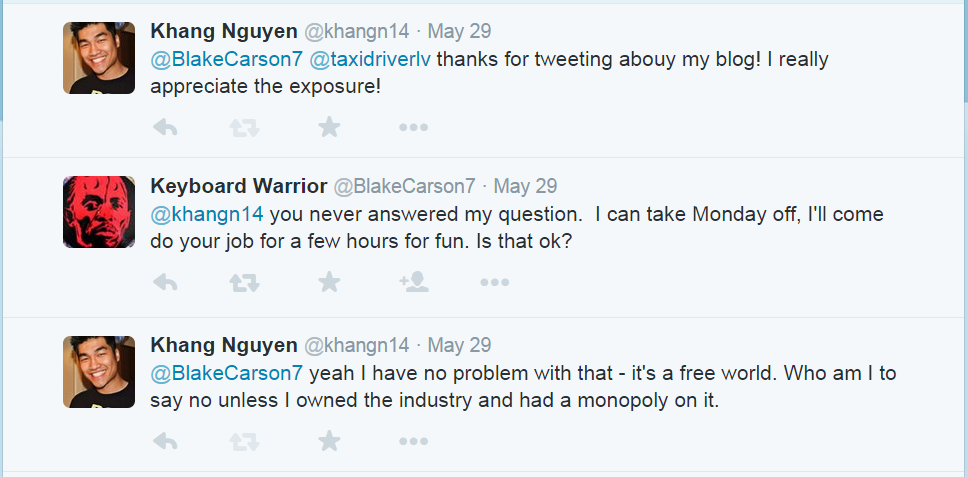
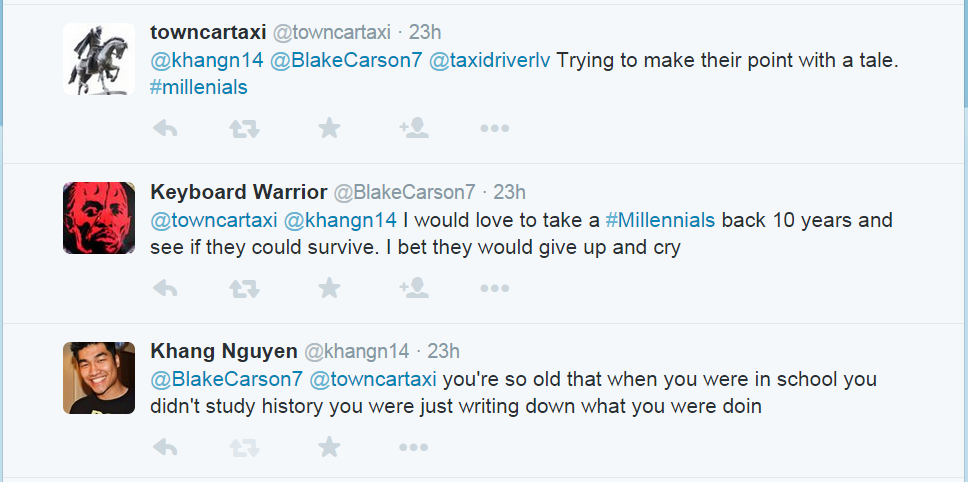
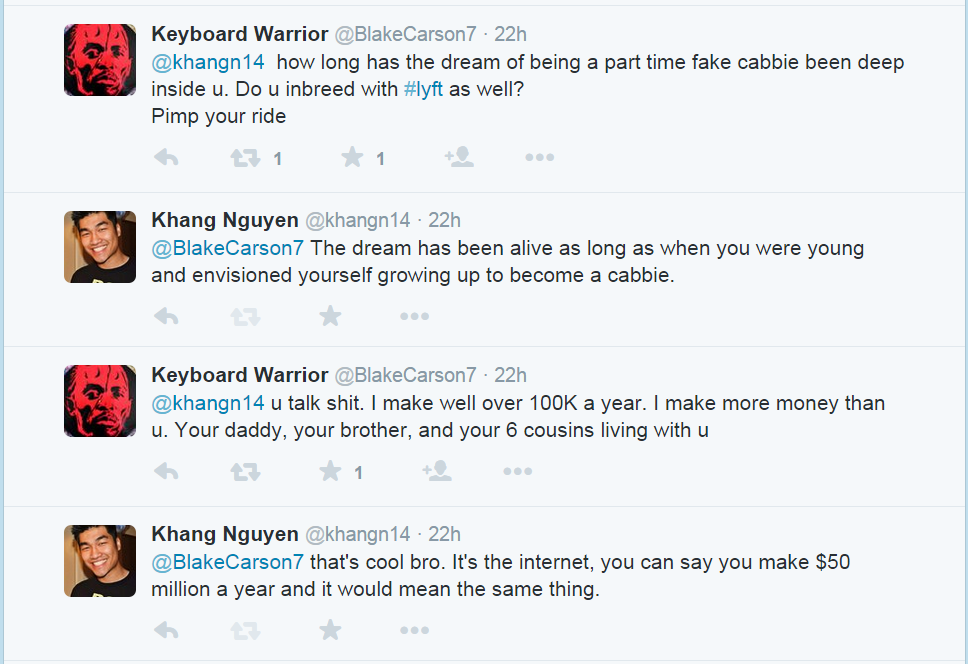
Then the wild troll appeared.
2 - 2nd call-outI tried to take the high road and thank him for talking about my blog. He also posted earlier about coming to do my job for a few hours like what I was doing to his.
3 - Free market!!And then a 3rd player jumps in and starts talking about cab driving being time-tested and we take a trip back to the future.

3 - MillenialsNext thing I know we’re talking about the generational battle against Millennials. I stole a joke from Key and Peele for my response.
4 - Going back in historyFinally, he asking if I drive for Lyft as well and how long I’ve wanted to be a cabbie then brags about how much he makes. This was our final interaction for the day and ends my idiotic rhetoric with dumb internet trolls.
5 - The Final Battle
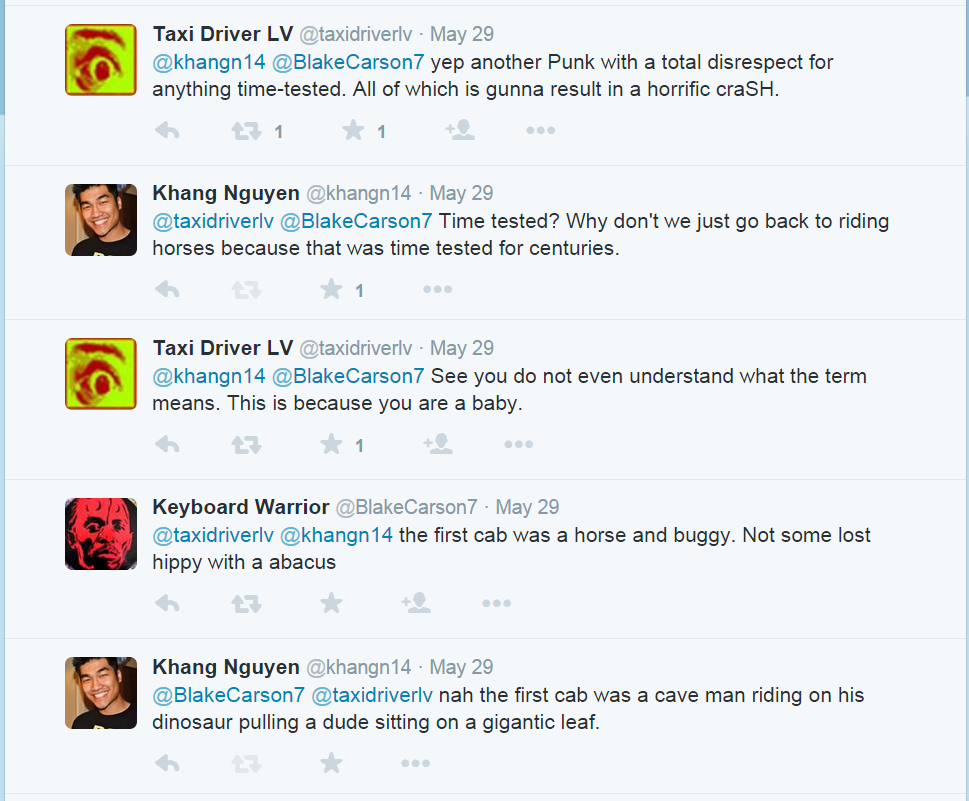
P.S. He then proceeds to post comments on my blog that I chose not to publish. Just goes to show you what people will say when they’re hiding behind their computer screen. FYI, @travisk is the CEO of Uber.
6 - Blog comments

Khang’s Review: Being a Driver for Uber in PDX

I remember my first time pretending to be a taxi cab driver was in GTA III where you could
steal a taxicab and then complete side quests by shuffling clients to where they want to go and get honestly paid for it. I actually tried to obey traffic signals, drive at the correct speed limit, and avoid running over the occasional prostitute – it was actually fun driving people around! Fast forward a decade and here I am doing it in person and getting paid real money for it! For those that have been living like the Flinstones, Uber is an app that hails itself as “Your Own Personal Driver” and gives the user the ability to call a “cab” from anywhere as long as they have an internet connection. I actually first heard of Uber on the Dave Ramsey Show and decided to check it out as a way to make additional income however it was banned in Portland until only a month ago. I have 3 nights and 19 trips under my belt so far and I always gets constantly asked what it’s like driving for Uber therefore I figured I would write a post about it! It is a fairly new thing in Portland however people have been embracing it around the globe and all my riders LOVE Uber. My favorite part is that it helps keep drunk people off the road – 95% of the people I’ve driven have been slightly to severely intoxicated and I’m very glad they decided to take an Uber ride rather than getting behind the wheel. Let’s get started!

Becoming an Uber Driver

The application process is fairly straight forward and what you would expect from a company founded and ran by Millennials – we don’t have time for bullshit and fluff, we like things simple and to the point. From the Uber login page you select that you want to register as a driver and then fill out your typical personal information along with adding your vehicle. The following are required documents you need to upload:

1. Vehicle Insurance
You must be one of the “named insured” on the policy or Uber will not accept your document.

2. Vehicle Registration
Your vehicle has to be 2005 or newer with 4 doors.

3. Vehicle Inspection Form
The inspection form can be completed on your own time at a participating mechanic – Uber has locations on their website and the cost is around $20. They also host free vehicle inspection events and that’s where I got mine however it was in Vancouver and I had to wait 1 hour for it to get completed but I heard the wait was 2-3 hours at the Portland one!!

Here is a screen shot of the Uber Driver home page:
Uber Homescreen
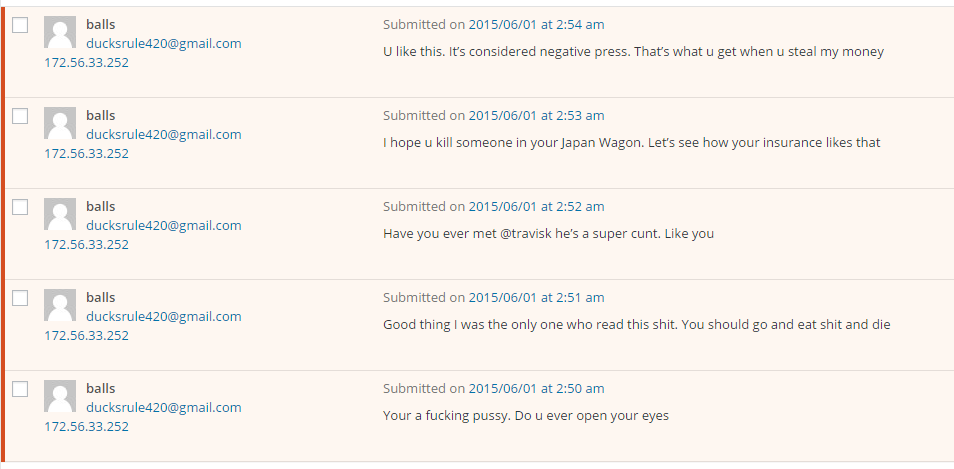
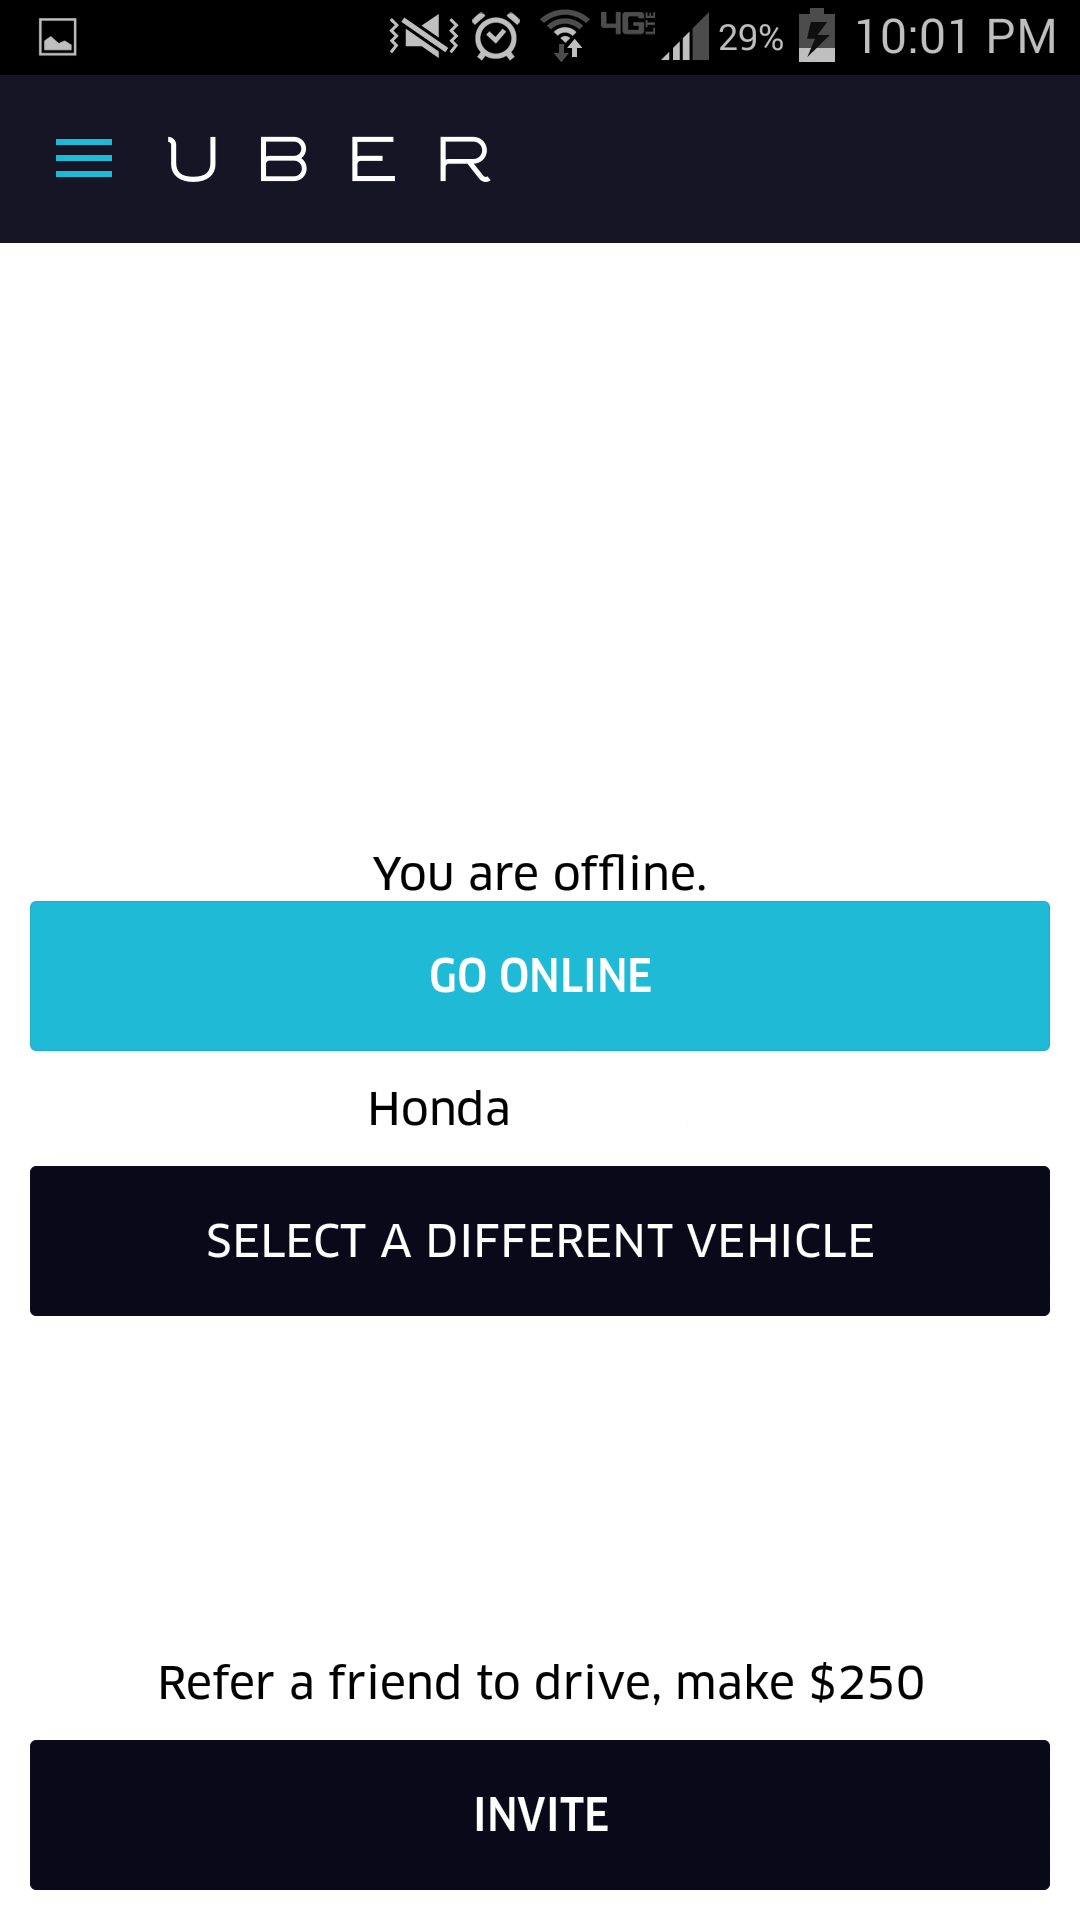
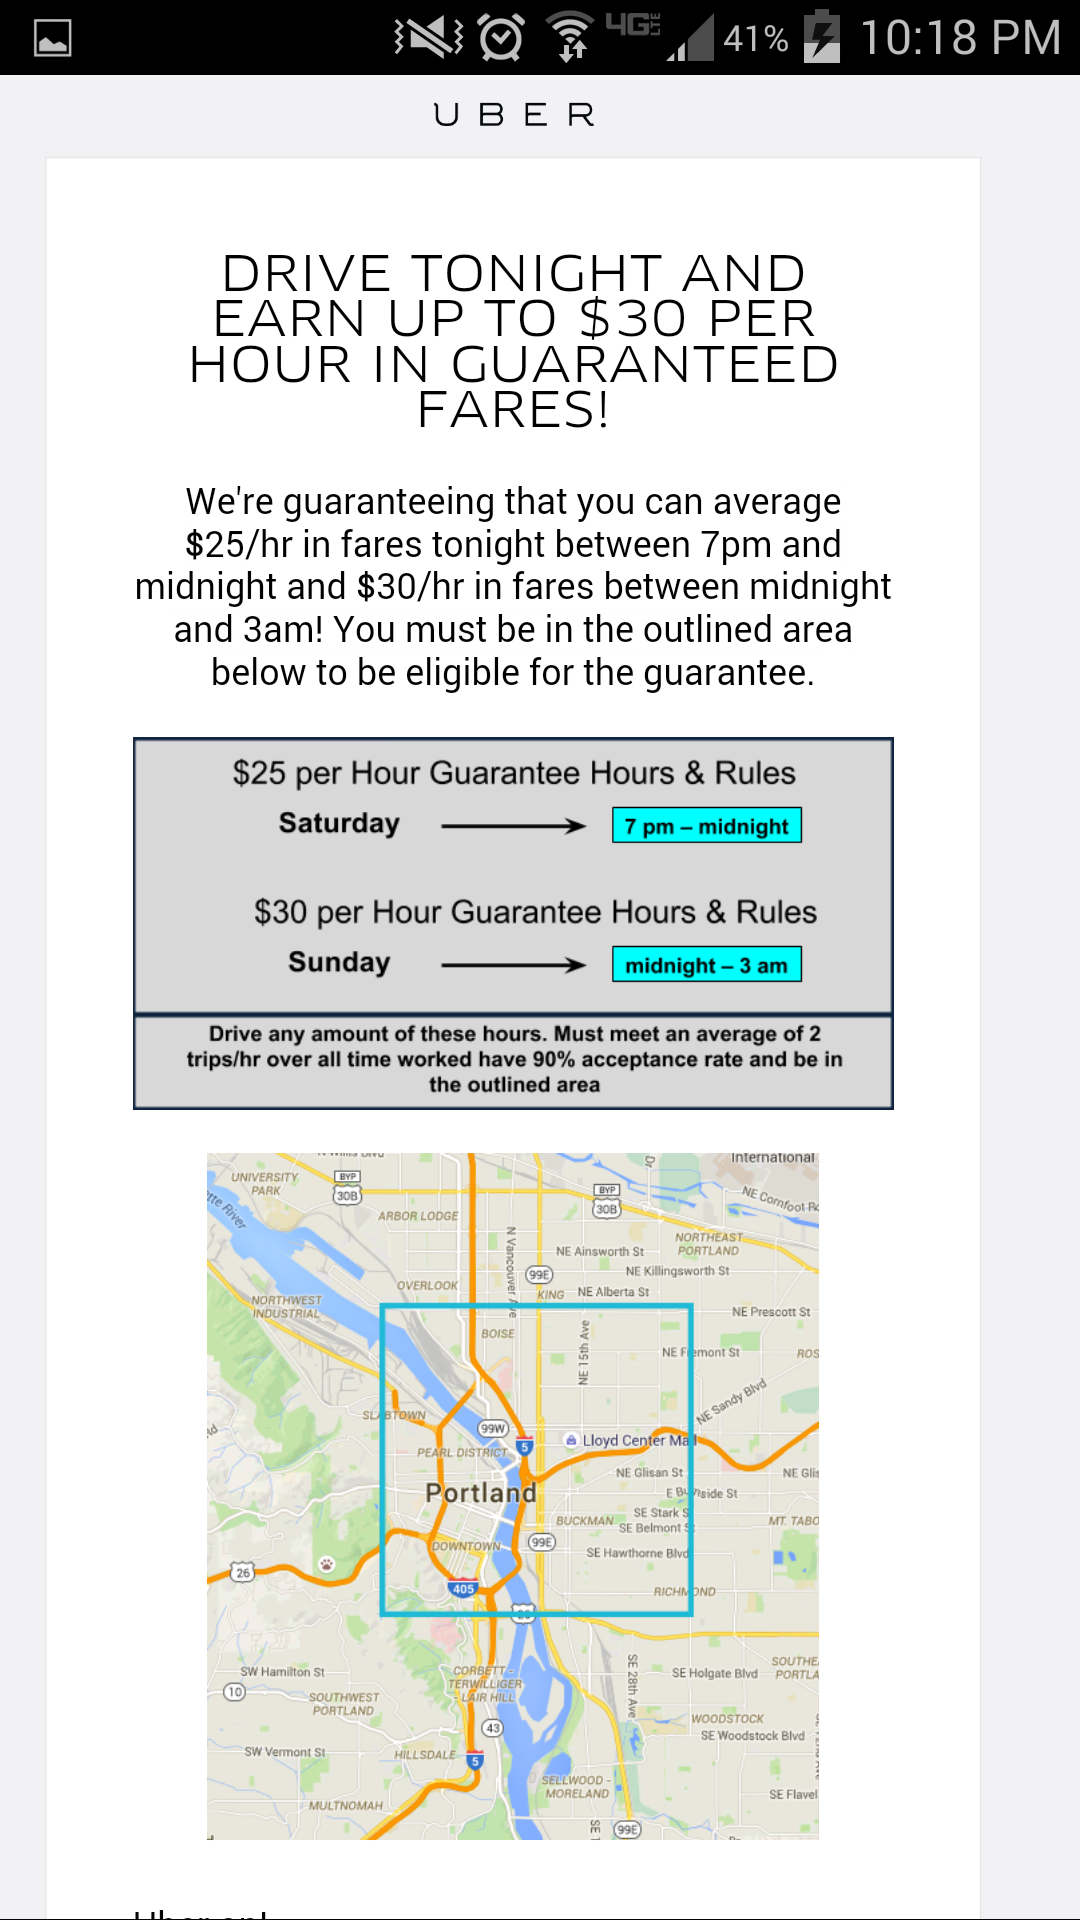
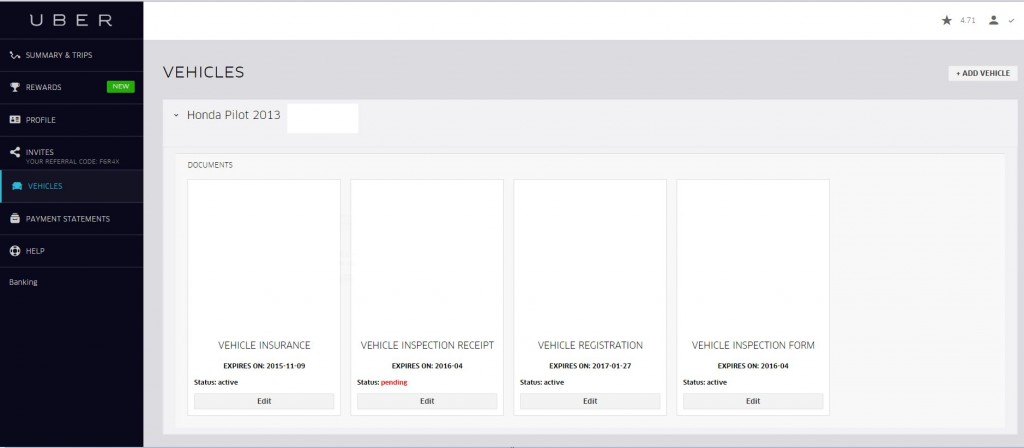
Uber will also run a background check and you can request to be cc’d on the documents (which I did) to see what the cops are saying about you! The check includes driving history along with a criminal scan. They’ll also put a small deposit into your checking account to validate it for direct deposit – mine was a $0.01 deposit. The background check will take 5-7 business days while the document review usually takes 24 hours. The whole process itself took 3 weeks for me with the most difficult part being getting the vehicle inspection completed around my work schedule. Once Uber checks that you’re all good to go they’ll send you a link to download the Uber Partner app and activate your account.

Here is a screen shot of the Uber Partner app vs the regular Uber app:

Uber App

Using the Uber Partner App

The app is extremely straightforward, any dummy can use it! This is what it’ll look like when you first log-in:

Online Screen

Then you just click “Go Online” and you are officially an Uber Driver! As you drive around to more populated areas you’ll get a “fare” and will have 15 seconds to accept or decline the fare. The screen will give you the location of the person, estimated time to get to their location, and the rating they’ve received from other Uber drivers – it does not provide you with where the person wants to go or what the fare estimate is. There is also no decline button, you just have to wait till the 15 seconds has ended however clicking anywhere on your screen means you’ve accepted the ride. Here is what it looks like when you’re “online”:

Being Online

Once you go off-line, there is an options menu in the left hand corner that provides you with other pages that includes your trip history, waybill, invite a friend code, help, settings, and a sign-out button. The waybill is basically a detailed history of your last trip that includes your fare, your passenger, where you picked them up, where you dropped them off, and insurance information.

Profile Page

The trip history is the fun part out of all these buttons! It lists all the rides you have completed and shows the route you’ve taken to complete the ride along with the fare that you earned. Clicking on each map will give you additional details like exact pick up and drop-off, duration, distance, and total fare.

Trip History

Trip Details

When you’re done driving for the night/day, just click “Go Offline” and you back to being a regular citizen.

Actually “Driving” for Uber

Once you accept your first fair they’ll provide you with a location for your rider and give you the option to navigate to their location. Once you click on the navigate button it’ll switch you over to Google Maps and give you directions to their location. Uber also requires that you have a hands-free mount and will reimburse you up to $10 for the device. Furthermore, if you don’t have a smartphone to run the app, you can rent a iPhone from Uber for $10/month but the phone is locked where the only thing you can do is run the Uber app.

Once you get to the designated location you’ll click “Arrived” and your rider will be notified of your arrival. There is also a number provided for you to text/call your rider to let them know where they can find you or to check in on them if you don’t see them. The number isn’t their personal number but acts like an escrow account where you call the generic number and it’ll relay the message to them kinda like Craigslist’s anonymous system. Once you see your client, be sure to ask “Can I please get your name?” to ensure that it’s the correct person you’re suppose to pick-up. I actually had a guy try to steal some other dude’s Uber. The guy said “Are you my Uber?” and started opening the door and I said, “What’s your name?” and he responded with “Uhhhh, Joel?” so I go, “Sorry buddy, maybe next time, good-bye bitch!” but without the bitch part.

The most important part of the ride is making sure you click begin trip when your passengers get in the car and end trip when the ride is complete – this is how you get PAID after all! Once you end the ride, you’ll be given the opportunity to rate your rider from 1 to 5 stars and they’ll have the ability to do the same for you. The rating is actually quite important as you I’ve heard you need to maintain above a 4.7 or else Uber will deactivate your account.

Getting Paid!!

Of course the most frequent question is “How much do you get paid?!?!”

The Rate: $1.50 Base fare + $0.30 per minute plus $1.55 per mile

Uber also has additional incentives like where they’ll guarantee you’ll make $25/hr during busy times but you’ll have to meet certain requirements like a minimum of 2 trips and a 90% acceptance rate. Here’s what I mean:

Uber Guarantee

The work week ends on Monday at 4 AM Pacific Time and you’ll get paid on Thursday. Your pay stubs are easily accessible online and they are very clear and concise. At the end of the day, Uber takes 20% of your fares. Here’s one of my pay statements:

Weekly Summary

Driving for Uber has been a very fun experience so far and I’ve learned a lot more about the surrounding Portland area. It’s also greatly increased my knowledge of the streets and roads and fastest ways to get on a highway. I have no complaints so far and it truly is a perfect part-time job; wear whatever you want, work whenever you want, and the work itself is relaxing and stress-free. If you’re interested in becoming an Uber driver, don’t hesitate to contact me and use my referral code!!!

F6R4X

5 Important Life Lessons I learned from Diablo II: Lord of Destruction

D2 CoversOne of the fondest memories of my childhood is playing Diablo II and the expansion pack Lord of Destruction. I’m sure anybody who has played any MMO can relate and say they’ve made great friends through the game and you truly get lost in that wonderful world. I played this fantastic game starting from 5th grade all the way up to 10th grade and stopped after that, however, there are people still playing the game! The game consists of choosing a hero class and then leveling them up by killing monsters through five different “Acts” and ultimately defeating the 3 Prime Evils of Mephisto, Diablo, and Baal in Acts III, IV, and V, respectively. You get better items and skills as you progress up your levels (maximum is 99) and once you “finish” the game then you’re free to go back to any Acts and kill more monsters. It seems repetitive and I truly don’t understand why I did thousands of cow levels, Baal runs, and Magic Finding quests but I loved every minute of it. People might say that playing video games is a waste of time but I feel that if you enjoy the time you’re spending on anything then it’s not a waste of time FOR YOU. It might not be the most productive thing you could be doing but you have a limited amount of time on this earth so you might as well enjoy it! Of course this mind set changes tremendously when you grow up and have that horrible disease called responsibilities. The game also taught me many great lessons that I’ve applied to my everyday life and helped shape who I am today – I thought I would share my experience for shits and giggles.

Lesson #1 – If you want to be GREAT at something, you need to put in the TIME

I spent a considerable amount of time playing D2 which I will go into further detail in Lesson #5. Let’s just say that if I used that time to read the dictionary instead then I would be able to recite the entire English language either starting from A and going to Z or from Z and going to A. I SPENT A LOT OF TIME PLAYING DIABLO 2! With all the effort and time I put it, it definitely showed in my account, items, knowledge, and characters that I had. By the time I quit the game, I was quite wealthy in this virtual world. I was rich enough to get any item in the game and was giving away items that people would literally jump up and down IRL if they found it during Magic Finding. To compare it to real life, I wasn’t rich as a Warren Buffet or Bill Gates but more like an Elon Musk or Mark Cuban. However, I started playing the game like everyone else: a level 1 hero with the default items. I put in the time to become great by learning about the game, the mechanics, how to trade, how to barter, how to maximize Magic Finding, and the relationship between players. As the saying goes, “There is no shortcut to any place worth going”. If you want to be great at something, then put in the time and you’ll see the fruits of your labor.

Lesson #2 – NEVER give your password to ANYONE

D2 Login

In this age of technology, this might be more important than ever. I learned the hard way not to entrust your password to anyone. This happened perhaps during 7th grade and I had multiple accounts however my main account was the one I entrusted to a friend. He wanted to see what my characters had and play on my account for a little bit. Being the nice guy that I was, I said sure go ahead since I had other accounts I could play on. I trusted him but the problem was that he then told my password to his other friend who I barely knew. Next thing I know, that dude changed the password on my account and would not give it back to me. It was extremely infuriating and it still boils my blood when I think of that interaction. If that guy is reading this and you know who you are, YOU’RE A PIECE OF SHIT! I wish that you never plug in any USB device the right way on your first try and always have to flip it AND that you always feel like sneezing but never get the satisfaction of being able to sneeze! Never give your password to anyone, I don’t care if it’s your mom or if you’re telling it to your cat! DON’T GIVE YOUR PASSWORD TO ANYONE!!

Lesson #3 – There is ALWAYS a way to make MONEY doing something you LOVE

I first found out about people selling Diablo items on eBay shortly after I started playing and finding it was impossible to trade for an Ume’s Lament with my measly items and wanted to buy it from someone. Unfortunately, I didn’t know anything about buying something on eBay or even how bank accounts worked. Fast forward to freshmen year of high school and I was now quite rich in Diablo 2 and had a large surplus of items that people would actually PAY for. Logically, I researched how to sell items on eBay and had my dad/mom help me set up the account and I learned a lot about the financial world through this small endeavor. I also learned how to market my product and make an appealing website for potential buyers – the name of my store was Khangaldinho’s Arsenal haha… blame it on my youth for that goofy name 🙂 The first item I ever sold was a 160/60 armor that was very similar to the image below for $12!! That’s a lot of money IMO for a VIRTUAL item and to a 14 year old who has never made a dime.
DuskShroudI sold over 100 items on eBay and made enough money to buy my own soccer cleats! I will never forget the feeling I got when I was able to buy those shoes with MY OWN MONEY! THAT I EARNED ALL BY MYSELF! They were golden Nike Mercurial Vapors and I still have those shoes to this day. I learned that there is always a way to make money with something, you just have to be creative about it or sell it in a way nobody has thought of before.

Lesson #4 – Plan and gather as much information as you can before proceeding with any endeavor.

D2 CharactersThis is a lesson I learned from wanting to play different hero classes and didn’t want to trudge through finding/trading items as I leveled up. I was lucky to be in a position where I could fully furnish any character I wanted with just a few days of trading. For every new character I created, I did extensive research on what the best items, builds, skill sets, and attribute allocations were. I searched forums, talked to players in-game, and ultimately modified the build according to my own knowledge of the game. Therefore, as soon as my character was created and “rushed” I was able to hit the ground running and didn’t waste time learning how the character worked, I already had everything planned and figured out from the start. This lesson has transcended to my everyday life where I do extensive research and calculations before I begin any time consuming task or something that has any risk aspect.

Lesson #5 – Video games can be EXTREMELY ADDICTING

As I mentioned, I spent a lot of time playing Diablo 2. For example, in the summer time I would wake up around 9 AM and start playing Diablo with bathroom and food breaks in between and play up until 2 AM and then wake up again at 9 AM to repeat the pattern for the next 3 months. I didn’t know what “addicted” meant as a kid because I was having so much fun playing and I had a lot of friends that played as well. I mean I went to soccer practice and tournaments and played with my friends outside like a normal kid but the majority of my time was definitely spent playing Diablo. It got so bad that my dad actually took out my Diablo 2 disk and SNAPPED IT IN HALF! I got a little addicted to other games as well like Star Craft and DotA but nothing was comparable to the time I spent playing D2. Be very careful of getting attached to video games and be cognizant of how much time you’re spending on these things – you can very, very easily get lost in the virtual realm. I would relate it to being at a casino, you sit down for a few games at the start of the night and next thing you know it’s 5 AM! This is the reason I never played Diablo III after being a die hard D2 fan – I knew I couldn’t handle it.

As silly as it sounds, Diablo 2 shaped me into the person I am today – for better or worse. Either way, I would never hesitate to take the Soul Stone and penetrate it into my head again!

Here is a photo of where I spent a lot of time in Tristram – in the COW LEVEL!!
The_Cow_KingPhoto sources:
(Photos 1,2,4) Blizzard Entertainment
(Photo 3) http://wiki.theamazonbasin.com/images/thumb/9/92/The_Cow_King.png/384px-The_Cow_King.png
(Photo 5) http://i42.tinypic.com/nqu0p3.png

Buying Life Insurance as a Millenial

If you’re around the age of 24-32 then your Facebook feed is probably getting BOMBARDED with constant updates of babies, pregnancies, and couples who have just got married. Some people are bothered by it but I’m very happy for everyone that they’re taking a big step in their lives and growing up! It’s a fantastic feeling when you’re no longer just looking out for Numero Uno and have a crime-fighting partner who you can trust to take the shot when your life depends on it and who you are more than willing to take a bullet for. However, with the greater responsibility that inherently comes with the territory then the risk also increases. If something happens to you then it just doesn’t affect you but your family and others who are dependent on you. This could lead to more household/family duties for your significant other and a greater financial burden if you happen to lose your job or cannot work. The extreme case of this is when you cease to exist in The Matrix and get erased completely. The emotional expense it will take on your family is incalculable and if you can minimize the destruction in anyway then you should take those necessary precautions. One major consideration should be buying life insurance to at least minimize/eliminate the financial burden on your family.

I use to think I was invincible and cannot die because I am the narrator of this story and everything would end if I died. Unsurprisingly, I’ve matured and eliminated this way of thinking and embraced the fact that my family would have to go on and suffice if anything ever happened to me. Now, I have a little girl to worry about and a significant other who depends on me therefore it was a logical decision to have a safety net in place if anything does happen to me. I must thank Dave Ramsey for getting me thinking about buying life insurance because I figured that I had it through my work and therefore I was covered. THIS IS NOT THE CASE! I looked at the life insurance I had through my company and it was for 1 year of my salary – after funeral expenses, that money would last probably 1-2 years. One story that he keeps telling is the husband who buys life insurance and then a few months later is diagnosed with terminal cancer. We’re all just dust in the wind and eventually we’ll be taken to a greater plain therefore please plan accordingly even though your path is undetermined.My first question when looking to buying life insurance was, “how much do I need?”.

There are many opinions out there and you can Google for them however the one I used is called the DIME method.

  • D = Debt – How much money your family will have to pay the creditors when you perish.
  • I = Income – The recommendation is 10 X your income
  • M = Mortgage – How much do you still owe on your home/properties before it’s paid off
  • E = Education – How much does your children need to complete their education

I made a simple spreadsheet for this and determined that my rough estimate is close to $1 million dollars therefore that was the policy I was shopping for. Here is my simple spreadsheet:
DIME MethodThe second question is, “what type of insurance should I get?”. The two most widely used out there is Whole Life and Term Life insurance. Whole Life provides you with a coverage amount you set and a higher premium where the additional dollars above your premium goes into an account that builds your “equity”. Dave Ramsey does not approve this method as you can make more money by taking those additional dollars and invest it yourself. Also, life insurance is not needed for your “Whole” life because as soon as you become fairly wealthy then your family should be financially stable enough to handle any money issues. Term life insurance is similar to car insurance where you pick an amount of coverage and a “term” of how long you want the insurance for. This is the one that I went with because, as I mentioned before, you shouldn’t need life insurance for the rest of your life and it provides the best option with the lowest premium.
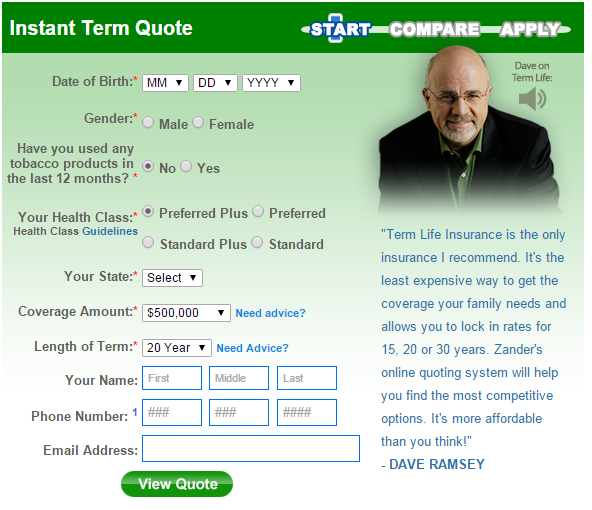
The next step is to decide where to buy your life insurance. I went to the life insurance broker Zander Insurance, who is recommended by Dave, and they made the process of buying life insurance very easy. You enter in some basic information and they’ll provide you with several quotes from various life insurance companies. I just went with the lowest premium and of course I reviewed the company online to ensure they’re competent and rated a good company by others. Here is the information you’ll have to fill out:
Zander InsuranceAfter you choose a life insurance company, a representative will contact you to set-up the health screening and paperwork process. I spent around 30 minutes answering questions with the rep about my health history, my current health status, and if I participated in any dangerous activities like sky-diving, rock-climbing, and/or battling dragons. After that initial health phone call they’ll send a nurse to your house to get blood testing completed. This wasn’t a new process to me because my company does the same thing to determine if you’re eligible for a health insurance discount. When the lab results are complete, they’ll notify you if you’ve been approved for life insurance or not. Finally, they’ll send you your policy to review and sign. Some notable notes I have from reading my contract.

  • The policy will not be active until the premium is WITHDRAWN by the life insurance company
  • They will withdraw (2) months worth of premium on the initial payment
  • The policy becomes incontestable after 2 years
    • If you decide to suicide within those 2 years then the policy could become void
  • The company has the right to eliminate the policy without notification if premium cannot be withdrawn due to insufficient funds

Overall, after (2) years your family should have no issue with getting your policy redeemed with the proof of the death certificate. The entire underwriting process takes 3-4 weeks depending what your schedule is like to get the health screening completed.

If you are married, have a family, or have any other person depending on you then take this small step to ensure that at least they won’t have a financial burden upon your death. Nobody wants to think about their death however it’s a thought that needs to be taken seriously if you truly care about the people in your daily life.

What’s in your wallet?

“What’s in your wallet!?” is the famous slogan marketed into this world by Capital One and I think it’s a very fascinating way of looking into a person’s life through the perspective of their wallet’s contents. I’m not referring to a person’s financial standing but what they keep in their wallet and the reasoning for each item. I remember when I was out with my coworkers one night and we decided to pour our wallet’s contents on the bar table. There were people with entire novels inside their wallets! Carrying every punch card they’ve received from all the eateries along with a random library card from a place they’ve visited only once. This contrasted with the minimalist who carried a money clip that had only one credit card, one debit card, his license, and $20 in cash. It was very enjoyable for me to take a peek at someone’s life through their wallet and how to correlated with their personality. Therefore I thought it would be a good post topic: “What’s in MY wallet”.

Here is a corny photo I took of 80% of my wallet contents.
Whats in my walletDriver’s License
This is the quintessential item I have in my wallet as it acts as my main form of identification and, more importantly, bears the responsibility of allowing me to consume alcohol.

Contact Card
I put my business card in the front in the case of an emergency where first responders might need to contact someone during business hours. On the back of the card, I’ve listed (2) emergency contacts. The main card in the front is laminated while I carry (3) regular business cards just in case I might need to exchange one with a new business contact.

Health Insurance Card
This is also for an emergency situation for when I might have to be taken to a hospital. Of course if it’s a life or death situation then take me to the nearest hospital! But if it’s not then please take me to a place that’s within my network! If you’ve ever had a health emergency then I’m sure you know how the costs can quickly become astronomical – I once had a 15 minute ambulance ride that cost $1,400!

College Student ID
This is just to show that I’m always a BEAVER! And to test my youthful good lucks trying to get that college student discount whenever I can!

$40 Cash and $8 in spare change
I went the longest time without carrying cash because I would only use my credit card. I learned the hard way that I needed at least some cash on me when I went to Cartlandia and all the vendors were CASH ONLY – I was so hungry but I couldn’t “afford” any food with my stupid pieces of plastic rectangles. I picked $40 because it’s a good amount when you’re in a pinch like needing to buy a decent meal for you and your date; geting a cab home or to a friend’s house when you’re too drunk; buying that awesome Domo Kun plushy at the flea market; or making a quick $20 bet on the spot that you can hit the goal post from the 18 yard box. The reason I carry $8 in two dollar bills is solely to give to homeless folks I cross paths with. My parents have always taught me to give to needy folks whenever I can and this is something I do as a small act of kindness. For $2 they can buy a Big Gulp and hot dog at 7-Eleven – a deal that I take advantage of whenever I get the opportunity!

Debit Card
It’s not shown in the photo but I always carry my debit card just in case I need to withdraw money from my checking account. The odd thing is I keep a very low balance in my checking account at all times – it’s usually below $75. My checking account balance is low because I believe I can maximize my money by putting it in other areas rather than letting it sit in a no-interest checking account. US Bank gives you a couple of designs to choose from for your debit card and I picked the Broncos one because Tim Tebow was playing for them when I got the card. However, as soon as I received the card the Broncos freaking cut him!!! I’ve been stuck with a Broncos debit card but I’m not even a fan……

Credit Cards
I carry all eight of my credit cards with me (only 4 of my cards are shown – the sexy ones) because I put a small charge on them to prevent the credit card company from closing the account. My main card is the Chase Sapphire because the points don’t expire and I reconcile the points to get a big check when I’ve built up 10,000 points ($100). I constantly check to make sure all my cards are there because I don’t want to go through the hassle of losing a credit card and not “promptly” reporting it.

Those are the contents of what’s in my wallet. Hopefully you learned something new about me and the next time your getting drinks with your buds, take out your wallets and see what it says about them. Do this prior to getting wasted as you’ll most likely find out that several of your items are missing by the next morning.

What’s in YOUR wallet?!

Khang’s Review: Every Dollar Budgeting Tool by Dave Ramsey

Dave Ramsey released last Monday 3/23/15 what he has called the best budgeting tool available therefore I thought I would take it for a test spin and see if it’s better than the Mint or the custom Excel spreadsheet I made. The product is called Every Dollar and there is a free version along with a Plus version that costs $99/year which allows you to sync transactions with your bank accounts (basically what Mint does for free). The log in screen is the same as any other website where you would need a username/password. However, the verification email that they send can take up to several hours! It also gets easily lost in your junk email therefore it’s best to check in there first if you don’t see it within a few minutes. In this day and age, and after Dave spent a couple million bucks to get this running, it should only take a few seconds to receive a verification email not several hours.EveryDollar Log-in Page
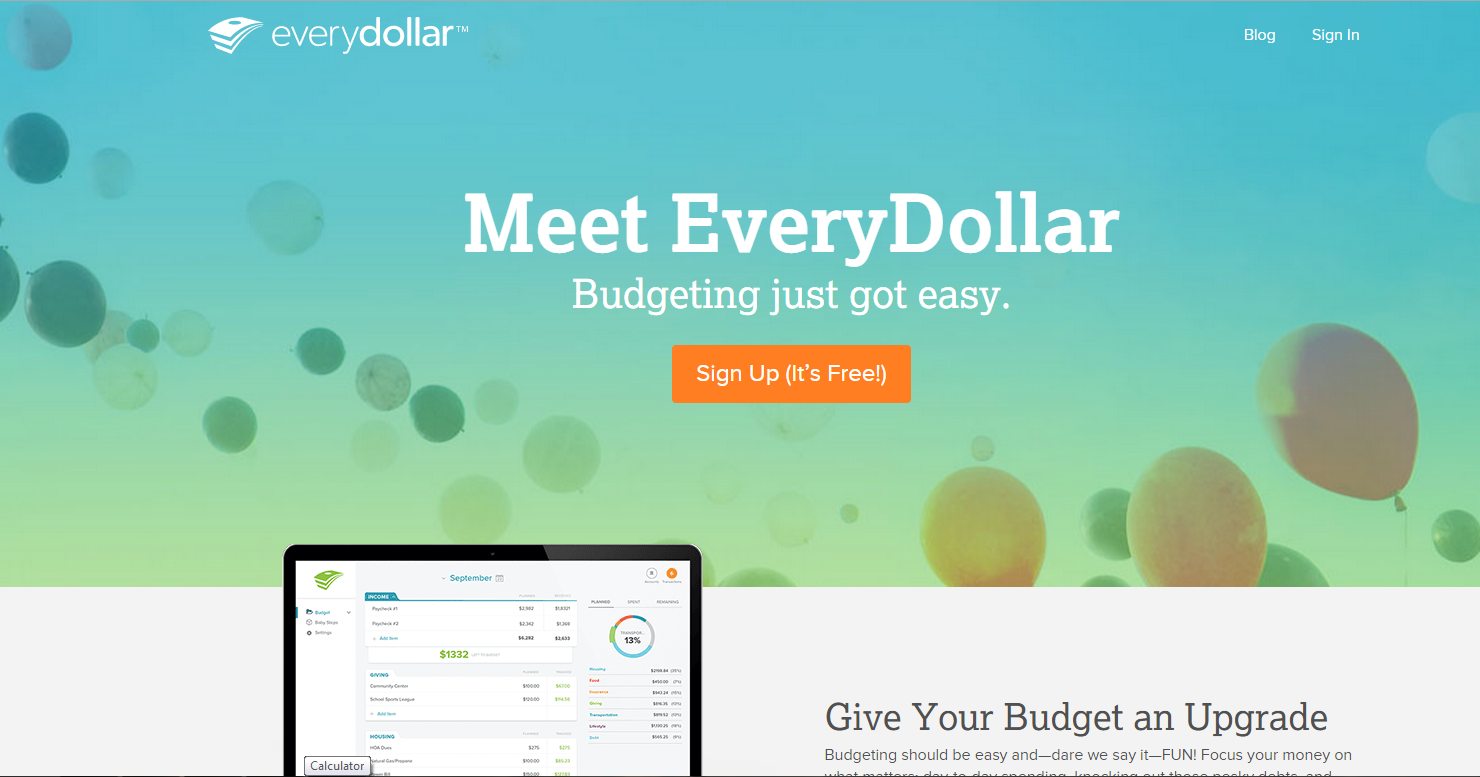
The website itself is very beautiful and easy to navigate as you can see below. Categories are very cleanly separated with a distinguished tab to help you differentiate between your budget items; the initial category is your income where your budget should start and the default categories are giving, savings, housing, transportation, food, lifestyle, insurance & tax, and lastly your debt. These categories then have smaller sub-categories where you can add your own custom budget line item. An extra item they have on the side is the “Baby Steps” which is Dave Ramsey’s steps to becoming financially wealthy and I think it’s a nice touch but seems a little weird to me that it’s included in the tool – but it’s his budgeting tool so how could he not sneak it in there??
EveryDollar Initial Page
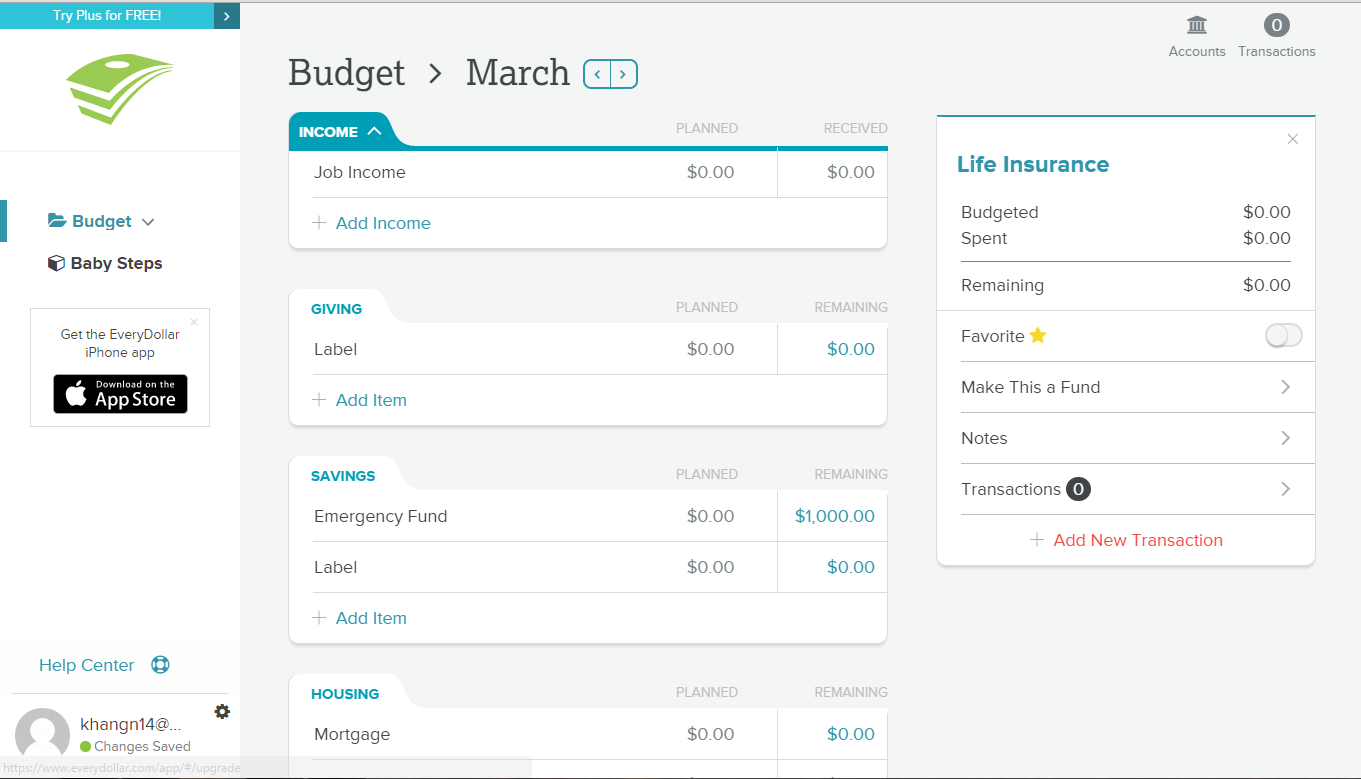
The initial step is to put in your monthly income and then move down the line to fill out all you budget items. A nice feature is that as you scroll down the screen, the amount that you have left to budget is locked at the top for you to see. You can also click on the remaining amount and that will toggle the website to switch to how much you’ve spent in your budget. This gets a little annoying because I thought I could change the spent amount by clicking it but I can only do that through the added transactions. Speaking of the transactions, this is where the budget tool fails miserably and makes it no better than a mediocre tool.
EveryDollar TransactionTo add a transaction, you click on the budget category and click on add new transaction to the right. The screen lets you add either an expense or income and asks you for the date and amount. As you get more transactions then you have to manually input them into your budget category but if you have the Plus version then your transactions will automatically populate from your bank accounts. As you can imagine, this can become extremely time consuming with the number of transactions you have. Budgeting is a struggle for most people already and making it as time consuming as possible creates a difficult obstacle for people to overcome.

And that’s pretty much Every Dollar in a nutshell because that’s all budgeting is – starting off with your income amount and then subtracting all your expenses until you’re down to 0.

The downfall of Every Dollar is that you have to manually input the transactions and you have to PAY if you want the automatic transactions. With Mint, you get the transactions for FREE and it’s very easy to categorize them into your budget items. If I were you, I would not purchase the Plus version because you can do everything with Mint and you also get all the balances of your other accounts as well. The website does look nice but doesn’t do anything special that Mint or my custom excel doesn’t already do. If they make the Plus version free then they might have a fighting chance but for now, it is an inferior product to Mint’s budgeting tool and his statement of best budgeting tool available is definitely an overstatement.

In conclusion, Every Dollar is too time consuming to be a worthwhile budgeting tool because you have to manually input all your transactions. Stick with Mint if you want the best bang for your buck (FREE) and time. I hate to say it but I think Dave Ramsey made a bad investment by spending $3-4 million dollars and multiple years on this product. The only reason this budgeting tool is getting any traffic at all is because it’s backed by Dave Ramsey; if it wasn’t then it would just be another mediocre tool lost in the ether of the internet.

My experience with selling/donating plasma

My first experience with blood donation was in high school as a 16 year old when I donated for the Red Cross when they came to my school. I thought it was really cool to be able to donate and save someone’s life and the experience has led me to become a lifetime blood donor however I haven’t done it in a few years. This initial experience allowed me to get familiar with the process and learning not to be afraid of the HUGE ASS needle that they stick in your arm! That’s okay with me since needles, like the cold, never really bothered me anyway! And as sickening as it sounds, I actually like to look at it when they stick me.

I heard about plasma “donation” on the radio when I was a senior in college and they advertised that you could make $300 a month by donating plasma. I’ve read multiple articles about the semantics battle between using the word donation vs. selling and the main argument is that it’s not donating if you’re getting paid for it. At the end of the day, you are giving your plasma to help others survive and live longer therefore call it whatever you want but the end product is still the same. I decided to check it out and it was pretty identical to donating whole blood with the Red Cross except it took longer and you can donate twice in a week while you can only donate whole blood once every 8 weeks. I’ve donated at three plasma centers which include two locations from the same company in Gresham and Hillsboro along with a center from a different company in Portland. Before I started to donate plasma, I wanted to get as much information about the process, what its actually like, what can I expect, how much do I get paid, what are the health effects, etc., as I could. Therefore, the premise of this blog post is to provide my personal experience with the process mixed with what I’ve read over the annals of the internet – I’m going to report on plasma donation through my scope of what I saw and how I saw it.

The first step that needs to be done is to see if there are any plasma donations near where you live – this can be accomplished with a simple Google search for “plasma donation centers”. There are several providers that should have multiple centers where you live and from my experience they don’t vary that much from one to the other. I’ve read that centers are usually located in areas where people need the money like near college campuses and in the low-income parts of town. The centers I’ve participated in definitely fit this stereotype and the donors give off the vibe of being on the lower rung of the socioeconomic ladder. But at the end of the day, we were all donors trying to get a quick buck.

Once you find the center then you will need to go through the initial screening process which will take approximately 2-4 hours.During the process they will do a routine physical, ask you questions about your health, test your blood pressure, and take samples of your blood. It takes this long only the first time, your next visits will usually take 10-20 minutes before you begin your donation process. You can choose to donate after you pass this screening or elect to give a sample of your blood and then donate within the next few days. For the sake of my story, I will assume you just gave the samples and will return for your donation at a later date.

The following paragraphs is what you can expect when you decide to sell/donate your plasma as they are eerily similar at all locations. Once you enter the plasma center, you will go to the designated kiosk area where you sign-in with your thumbprint and answer similar questions that were asked in your initial health screening. If you’ve donated whole blood with the Red Cross before these questions will be very familiar like are you sick today, do you have any new tattoos, have you taken drugs monobobopoopo, coochietera, or tooko, have you ever had HIV, do you live with anyone with Hepatitis, yadda, yadda, yadda. There are approximately 20-30 questions and it’ll take you at least 5 minutes because you cannot move to the next question since they are timed. Here is a picture of the kiosk:Questionnaire KioskAfter you complete your questionnaire at the kiosk you will sit down in a lobby or wait in line until you’re called by a technician to complete your shortened health screening. Below is a picture of the lobby of the place I used to donate at in Portland. I’ve covered the face of the individuals to protect their privacy.
Main waiting roomDepending on how crowded the center is, you could wait anywhere from 2 minutes to an hour. When I donated at the center in Hillsboro it only took 2 minutes because it was new and basically empty around the time I came in (6:00 PM which is their closing time) while at the Gresham center it took closer to an hour because it was packed all the freaking time. The nurse will call you up and take you to a private room/stall where they will begin the blood screening process to make sure you’re healthy enough to donate that day. Here is a photo of what that room looks like, sorry for the potato quality.
About to get tested!You’ll quickly find out that they ask for your full name and last 4 digits of your social security very often. Not sure if this is to verify if you’re the same person (I know, I know…) or to make sure you’re still thinking properly and not high off your ass. You can’t see in the photo above but there is a scale just behind the chair and that is what they’ll have you do first. This is important because there are 3 ranges for the amount of plasma you have to donate correlating to your weight – I weighed around 160 and was in the middle band which required me to donate 880 ML. At some centers you get more/less money (+/- 
$5-10) depending on your weight and at others its constant no matter what you weigh although you do have to donate more if you weigh more but you get paid the same as that skinny ass person. After they weigh you, then the worst part of the donation happens: the finger prick! They’ll prick you finger to get a blood sample so they test for your iron and protein levels. Other things they’ll check include your blood pressure, pulse, and temperature. After you pass all those then you move into the donation zone or as I like to call it “THE MATRIX”.

Below is what THE MATRIX looks like. I call it this because the first time I walked into the area I was freaking shocked! It looked so surreal. The Gresham center has like 10 rows of beds and it was full of people hooked up to machines that were taking their life force similar to The Matrix before Neo got rescued by Morpheus. I wish I had a photo of the Gresham center as my photos below does not do it justice.
Plasma CenterPlasma Center 2Once you sit on the bed, the technician will ask you if you want the right or left arm. I usually alternate arms but some people use just one arm. My reasoning was that I wanted to let the wound heal and not collapse the vein which was unlikely. You’re allowed to donate twice within a 7-day period. The big, grey machine you see in the photo will take whole blood from your body and then separate it into plasma, which they’ll keep, and return your red blood cells back to you. The entire process takes approximately 45-90 minutes depending on how well hydrated you are. The fastest I’ve done was 41 minutes and the longest was 75 minutes. The IV needle stick starts with them pumping up your arm to see your vein and the best location to stick you! Once they determine your veins are good to go they’ll put iodine on the location and mix it for 30 seconds. Then the FUN BEGINS! They’ll take the needle and stick it in you! I’m a crazy person and I love to look at when they do. Other people look away like a little bitch but hey, I don’t judge. Here is a photo of me with the needle in me arm! The blot of blood is rare and usually no blood escapes from the wound except when they extract the needle.
Needle in me arm!After you near the end of your donation, they’ll either give you a saline pack through the IV or make you drink a bottle of electrolytes (Powerade or Gatorade) to help you replenish the fluids you’ve just lost. After that you’re all done and you get paid!

Most places will give you a very high dollar amount for the first 4-5 times you donate. IIRC, one place gave me $50 for the first time and $80 for the second time alternating till you gave 5 donations and another place gave me $50 for 4 donations. After that period expires, you’ll get into the regular payment schedule which gives you a small amount for the 1st donation and a larger for your second. For example, the most recent place in Portland was a $25/$45 split while the one in Hillsboro was $20/$40 – it varies from center to center but they’re all around that range. They also have promotions every month like you get a peel card for prizes on your 6th donation of the month or an additional $20 on your 7th and 8th donations.

If you just want to get some beer money, then this is a quick means to get that. You’re also helping others get crucial life saving medicine in the process. My only caveat is that you stop donating if you’re feeling/getting sick because it will prolong the amount of time you’re ill. I had first hand experience with this because I had a cold but kept going on keeping on. It was 3 weeks into my cold and I was very frustrated I didn’t get over it because I rarely got sick and never stayed sick for too long. I decided to stop donating and BOOM, within a few days I was back to normal. Your experience might vary but just giving you my insight. I also felt extremely drained after I donated and wasn’t able to do much – I just went straight to sleep as soon as I got home.

Therefore if you do decide to donate, make sure you know all the health implications and make sure you’re well hydrated the day prior, during, and after you donate. I personally had no qualms or ill effects from donating however there is limited research on the long-term effects for prolonged plasma donation. I’ve stopped donating at the request of my parents and I do miss the income a little bit; you can make more than 3 grand a year! Either way, you only have one body and money can’t buy health so make sure you cross your T’s and dot your I’s before you make the decision to start donating plasma. I hope this helps in your decision to donate and don’t hesitate to contact me through the social media links!

$20 is $20: Amex coupon for $10 rebate on phone bill

American Express sent me this coupon stating that they’ll give me a $10 rebate if I pay my phone bill using their card. I usually pay my phone bill with my Chase Sapphire card and then pay off that charge every month. The reason I do this is because then I would get points for the bill payment rather than just paying the balance with my checking account. Here are the details from American Express:

AMEXThe first part of the term is that your phone bill must be at least $75 therefore if you’re on a single plan that might be a little difficult. But the more important thing is that if you’re paying $75 for a single phone plan then you are paying WAY TOO MUCH for your phone! Being on a family plan with T-mobile made me meet this $$ requirement.

The second part was that you had to be part of one of the major carriers which they state as AT&T, Spring, T-Mobile, US Cellular, or Verizon. Therefore, sorry for those people using Clear, Metro PCS, Virgin, or any other obscure ones I haven’t heard about. As I stated above, I used T-Mobile therefore I met that second requirement as well.

The last part is that you can only use this coupon 3 times which didn’t really matter to me because all good things must finally come to an end. Once I use this coupon 3 times then I will go back to paying my T-Mobile bill with my Sapphire card because the points never expire! Also, that’s my primary card where I make all my charges on.

If you have the diligence to pay off this charge on your American Express card immediately then I don’t see why you shouldn’t take advantage of this free $10! Even a small amount can make all the difference and remember that $20 is $20!

$20 is $20: Chase Savings Acct. Coupon for $175

One thing I’ve noticed throughout my life is that there are millions and millions of ways to make money – all you have to do is open your eyes to them and complete your due diligence to ensure that it’s actually legit and worthwhile. The $20 is $20 line came from a picture I saw where a homeless man is wearing a shirt that said “I’m not gay but $20 is $20.” Aside from the humorous context of the shirt I took the meaning of the picture to mean that you shouldn’t discard an endeavor because of it’s monetary value because $20 is still $20 and if the opportunity presents itself, you should consider the terms and take it! I will write different posts where I’ve found these opportunities, all the terms, and the experiences I’ve had with attempting to cash out on these little life nuggets. The first one I want to talk about is opening a Chase savings account to get $175 (I’ve done this before with a $100 coupon).

chase savings


This is the coupon I received in my email from Chase stating that if I open a Chase Savings account and deposit $15,000 then I will get $175. Of course the only reason this coupon would work is if you have $15,000 to be able put into an account. The next part is to read through the fine print to make sure you can meet all the terms and that there aren’t any catches. Here are the terms of the deal:

Avoid the service fee by doing one of the following options (verbatim from the email):

Option #1: Keep a minimum daily balance of $300 or more in your savings account; OR,
Option #2: Have at least one repeating automatic transfer from your Chase checking account of $25 or more. One-time transfers do not qualify; OR,
Option #3: Have a linked Chase Premier Plus Checking, Chase Premier Platinum Checking or Chase Private Client Checking account. Otherwise a $4 Monthly Service Fee will apply in most states ($5 for accounts opened in CA, FL, GA, ID, NV, OR and WA). A $5 Savings Withdrawal Limit Fee will apply for each withdrawal or transfer out of this account over six per monthly statement period. We will notify you of changes to your account terms or fees. For more information, please see a banker or visit chase.com/savings.

The other important terms is how you get the bonus and more importantly keep the bonus – below are the details verbatim:

Bonus/Account Information: To receive the bonus:
1) Open a new Chase SavingsSM account, which is subject to approval; AND
2) Deposit a total of $15,000 or more in new money within 10 business days of account opening. The new money cannot be funds held by Chase or its affiliates. After we receive your minimum $15,000 deposit, we’ll deposit the bonus in your new account within 10 business days. For a Chase Savings℠ account, the Annual Percentage Yield (APY) for all balances is effective as of 01/23/15 and may change at Chase’s discretion. The APY is 0.01% for all balances in all states. Interest rates are variable and subject to change. Additionally, fees may reduce earnings on the account. You can only receive one new savings account-related bonus per calendar year. The offer is not available on account conversions, or in combination with any other offer. The bonus is considered interest and will be reported on IRS Form 1099-INT.

Account Closing: If your savings account is closed within six months after opening, we will deduct the bonus amount at closing

I’ll explain how I saw this deal and the experience that I had attempting to get this $175 from Chase.

The first thing I wanted to determine was that how long and how much did I have to leave into the account to gain this bonus. The reasoning behind this is that I currently had the money in an account that was gaining 0.75% APY while the Chase savings account would give you 0.01%. That means that in a month I would receive ~$10 from the current account and only $1.50 for the Chase account – that’s a yearly difference between getting $120 or $18. $120 might not seem much to you but remember the saying “$20 is $20.” Therefore it’s pertinent that you see how much and how long you need to keep your $15k in the account because you want to maximize the use of your money. Also, it’s important to note that this money is considered an “emergency fund” therefore you want the money to remain liquid and easily accessible therefore when I say “maximize the use of your money” this means that I don’t plan on investing this money because I need it to be accessible.

How much? The answer to this question is option #1 of avoiding the service fee. It states that you need to have a minimum balance of $300 to avoid the $4-5 fee. Therefore you need to just keep $300 in the account to avoid having the service fee erode your earnings. This means that you can withdraw $14,875 from the account and put it back into your higher earning interest account after the $175 is deposited into your savings account.

How long? The account needs to remain open for (6) months before you can close the account and withdraw your $300. I see this deal as advantageous because you are gaining $175 on your $300 for 6 months if you withdraw $14,875 as soon as you receive your coupon. This leads to the $300 gaining you an interest rate of almost 10% over the 6 months! How can you not love that when a typical savings account is giving you less than 1%?

Therefore if you have $15,000 and receive this coupon from Chase then take it because $20 is $20!! Also, be aware at account opening that you should be opening a Chase Savings account and not a Chase PREMIER Savings account. The banker tried to pull this fast one on me but I caught him on it and made him change it. If they make you open the premier account show them your coupon and say that you want to open the regular account. If they don’t allow you to do that, then leave because the deal won’t be worth it. The reasoning behind this is that the Premier account requires you to keep a minimum balance of $15,000 and what is the trade-off they give you for this?? An interest increase to 0.03%!!! A WHOLE 0.02%!!!! WOW THANK YOU CHASE!!! Yeah F that.

Good luck!